How to Install a Dimmer Switch: Easy Steps for Beginners
Switch June 18, 2026
Picture this. It's nine in the evening and your living room light is either blasting at full brightness or completely off, with nothing in between. You want something softer for movie night, but flipping a switch only ever gives you two options. If you've been wondering how to install a dimmer switch, here's the good news: it's one of the most beginner-friendly upgrades you can make at home, and you do not need to be an electrician to get it right.
This dimmer switch wiring guide covers the full step by step installation process in plain language, with safety built into every stage. By the end, you will know what tools to grab, how to tell if a dimmer will work with your bulbs, and how to wire everything correctly the first time. A few setups are better left to a professional, and we will flag those clearly too.
What You Will Need
First of all, you’ll need a quality dimmer switch. If you don’t have any, you can check out LAXFO’s switch collection and choose the suitable one.
Now, before you touch a single wire, lay everything out within arm's reach. Working with the power off in a dim room is annoying enough without hunting for a screwdriver halfway through.
Here is what you will want on hand:
-
A flathead and a Phillips head screwdriver
-
A non-contact voltage tester (this one is non negotiable, more on why in a moment)
-
Wire strippers
-
A few wire connectors, sometimes called wire nuts
-
Your new dimmer switch and a matching faceplate
-
A flashlight or your phone's flashlight, since the breaker will be off
One more thing worth doing first: Keep the instruction sheet that came with your new dimmer close by, since terminal layouts can differ slightly between models.
Worth Reading: How to Replace a Light Switch in Simple Steps
Safety First
This is the part that actually matters most, so do not skim it.
Start by switching off the breaker for that circuit at your main panel, not just the wall switch. The wall switch cuts power to the light itself, but the wires inside the box can still be live. Once the breaker is off, run your voltage tester over the wires before you touch anything and confirm each one reads no power. This takes thirty seconds and it is the single most important step in this guide.
A quick, honest note here. Wire colors are a helpful guide, not a guarantee, especially in older homes or ones rewired over the years, which is common in plenty of homes here in Bangladesh too. Never assume a wire is safe just because of its color. Test it, every time.
Call a licensed electrician instead if any of this applies to you
-
There is no neutral wire in the box
-
You are dealing with a three way setup you are not fully confident reading
-
The wiring looks old, frayed, or damaged
Worth Reading: 10 Benefits of Smart Switches for Homes
Choosing the Right Dimmer Switch
Not every dimmer switch plays nicely with every light bulb, and this trips up a lot of first timers.
Older dimmers were built for incandescent bulbs, which handle dimming very differently than LED bulbs do. Put an LED bulb on the wrong kind of dimmer and you will likely notice flickering, a faint buzzing sound, or a dimming range that stops well short of actually dim. The fix is simple. Look for a dimmer clearly labeled as LED compatible, since these use electronics built specifically for the low, steady current that LED bulbs draw. Getting your LED compatible dimmer switch setup right from the start saves you a frustrating second trip to the store.
Wattage matters too, in a slightly different way than you might expect. Add up the wattage of every bulb the switch will control, then choose a dimmer rated above that total. LED setups also have a minimum load, so too few low wattage bulbs on one dimmer can cause the same flickering you are trying to avoid.
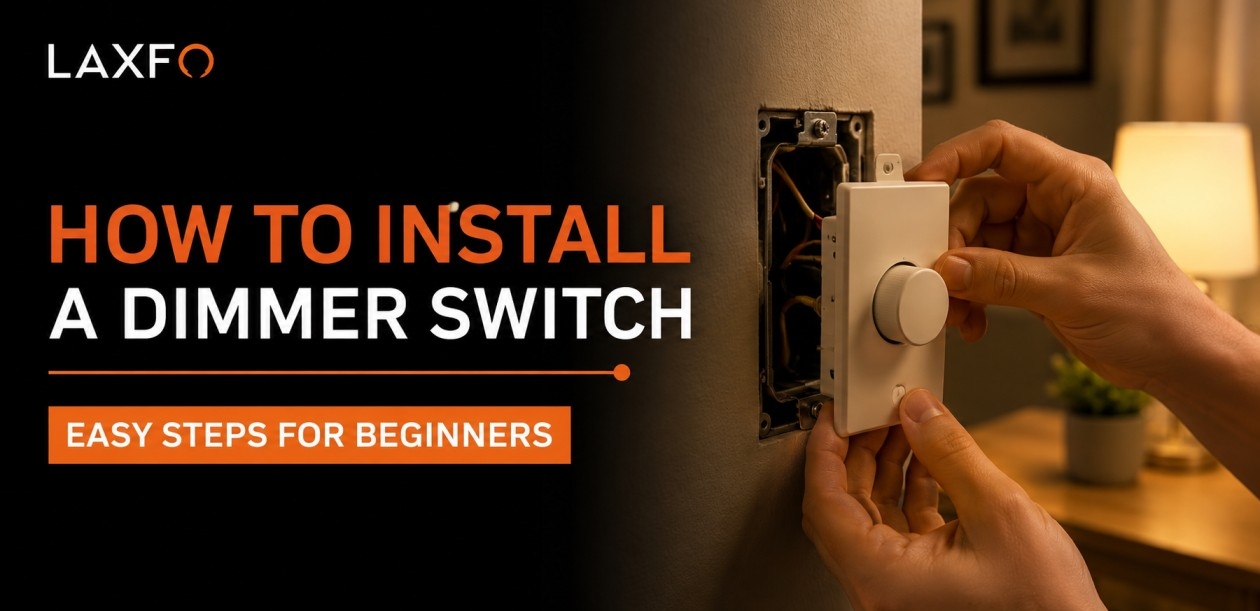
How to Replace Your Wall Switch With a Dimmer, Step by Step
Once you have your new dimmer and the power confirmed off, here is how to replace a wall switch with a dimmer in five steps.
Step 1: Turn Off the Power and Test
You already know this from the safety section above, but it is worth repeating right where the work begins. Flip the breaker for that circuit off at your main panel, then confirm with your voltage tester that the wires are not live. Do not skip this, even if you are confident you flipped the right breaker.
Step 2: Remove the Wall Plate and Old Switch
Unscrew and remove the faceplate, then unscrew the old switch itself from the box. Before you disconnect anything, take a photo of the wiring with your phone. It sounds like overkill until you are staring at four wires twenty minutes later trying to remember which one went where.
Once you have your photo, gently pull the old switch forward so you can see the wires clearly, and loosen the terminal screws or connectors to free them.
Step 3: Identify and Label the Wires
Most single switch setups have a line wire bringing power in, a load wire carrying power out to the light, and a ground wire. If your switch controls one light from two different locations in the house, you are dealing with a three way setup, which adds a pair of traveler wires into the mix.
Use a small piece of tape and a marker to label each wire as you go, rather than trusting memory. If you are at all unsure which wire is which, this is exactly the moment to compare against your photo from step two, or to pause and call an electrician rather than guess.
Step 4: Connect the New Dimmer Switch
Match each labeled wire to the correct terminal on your new dimmer, following the instruction sheet that came with it. Connect line to line, load to load, and ground to ground, twisting the wire connectors on snugly so no bare copper is left exposed. If you have a three way dimmer, the traveler wires and the common terminal will be marked clearly on the unit itself.
Gently fold the connected wires back into the box without any sharp bends, leaving enough slack that nothing feels strained or pinched.
Step 5: Mount the Switch and Restore Power
Screw the new dimmer into the switch box, attach the faceplate, and step back to check that everything looks straight and secure. Head back to your breaker panel and switch the power back on. That's it. You have just learned how to install a dimmer switch from start to finish, and the rest is just testing your work.
Worth Reading: Top 12 Switch Socket Brands in Bangladesh
Testing and Fine-Tuning Your New Dimmer
Turn the light on and slide the dimmer through its full range, from completely off to fully bright and back down again. You are checking for smooth, even dimming with no flickering or sudden jumps along the way.
Many dimmers, especially LED compatible ones, have a small low-end trim adjustment hidden behind the faceplate or on the side of the switch. If your lights flicker only at the very bottom of the dimming range, that little dial is usually the fix. Turn it slowly while the light sits on its lowest setting until the flicker disappears.
Common Dimmer Switch Problems and How to Fix Them
Even a correct installation can run into a few common hiccups. Here is how to read them.
Flickering Light
Flickering lights usually point to a mismatch between your dimmer and your bulbs, or a total wattage below the dimmer's minimum load. Try a different LED bulb, or confirm the dimmer is genuinely LED compatible.
Humming Sound
A faint buzzing or humming sound, especially once the lights are dimmed partway, is often electronic interference between the dimmer and the LED driver inside the bulb. Swapping to a different bulb model usually clears this up.
If the switch does nothing at all, go back to basics. Confirm the breaker is genuinely on, then recheck every wire connection before assuming the dimmer itself is faulty. It is rarely the dimmer itself.
Frequently Asked Questions
Can I install a dimmer switch myself, or do I need an electrician?
Most single switch setups in good condition are genuinely beginner friendly, as long as you turn off the breaker and test with a voltage tester first. Call an electrician if there is no neutral wire, the wiring looks damaged, or you are unsure about a three way setup.
Will any dimmer switch work with LED bulbs?
No. Standard dimmers built for older incandescent bulbs often cause flickering or buzzing with LED bulbs. Always choose a dimmer clearly labeled as LED compatible.
What if there is no neutral wire in my switch box?
Some dimmer switches, particularly smart or advanced models, need a neutral wire to function correctly. If your box does not have one, check your dimmer's instructions for a no neutral option, or speak with an electrician about your alternatives.
Can a dimmer switch be used with a three way light setup?
Yes, but you will need a dimmer designed for three way wiring, along with the traveler wires already in place. A standard single pole dimmer will not work correctly here.
Final Thoughts
And that is really all there is to it. Installing a dimmer switch is one of those small upgrades that makes a bigger difference than the effort it takes, and now you know exactly how to do it safely. A few minutes of careful wiring today means years of better lighting. If you face any struggle while installing your dimmer switch, contact our team to get the right instruction to avoid any kind of accidents due to electricity. One of our representatives will help you by providing the exact instruction you need.
Related Blogs


